Production of spherical equipment display model
Production Plan for Spherical Equipment Display Model
1、 Design Analysis and Overall Concept
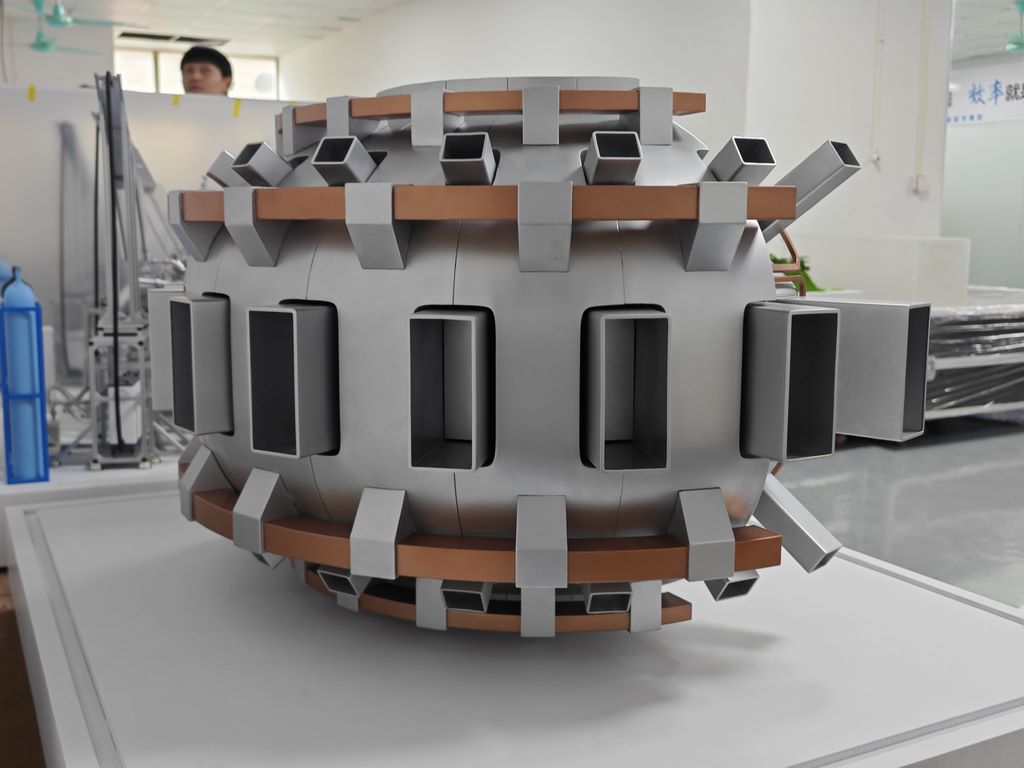
This plan aims to accurately reproduce the silver gray spherical device model shown in the picture. The core features of this model are its standard spherical shape, rectangular openings and sensor structure with regular surface distribution, unique brown ring shaped components at the top, and overall industrial instrument texture. The production needs to focus on the roundness of the sphere, precise positioning and edge treatment of the opening, as well as the color matching of silver gray and brown, ultimately achieving a visual restoration of over 90%.
2、 Material selection and matching art
The texture and structural authenticity of the model highly depend on the precise selection of materials.
Main structure material: the spherical main body uses high-density foam plastic or hollow wooden ball as the inner core to ensure light weight and easy molding. Cover the surface of the model with gypsum or atomic ash to create a perfect spherical surface and shape details.
Surface component material: rectangular opening reinforcement frame, bracket, and top square protrusion, cut and made of thin ABS or rubber plate to ensure sharp edges. The brown circular component at the top can be formed by hot bending ABS board or directly modified with ready-made plastic rings.
Adhesive: Epoxy resin adhesive or strong model adhesive is used for strong bonding between different materials such as plastic and gypsum.
Coating materials: water-based grid fill as primer, silver gray metallic paint (matte or semi matte) as main color, dark brown model paint for circular components, and finally matte protective paint to unify and protect the paint surface.
3、 Core production process flow
Sphere shaping and surface positioning
This is the foundation of the model. First, the foam plastic core or wooden ball shall be preliminarily trimmed to make it as close as possible to the standard ball. Then, use tools such as a sculpture knife to evenly scrape and apply model plaster or atomic ash on its surface. During the scraping process, it is necessary to continuously use templates or calipers to measure and gradually polish the sphere into a smooth and regular shape in different areas. Subsequently, according to the design drawings, accurately draw the positioning lines of all rectangular openings and brackets on the surface of the dry sphere.
Opening cutting and installation of detailed components
Opening: Use a pencil sharpener and ruler to finely cut a rectangular opening along the positioning line. The incision must be kept straight, and the edges need to be smoothed with sandpaper.
Reinforcing frame and bracket: Adhere the pre cut ABS Flat noodles to the opening edge to form a mechanical reinforcing frame. Similarly, stick the prepared bracket structure to the corresponding position on the sphere.
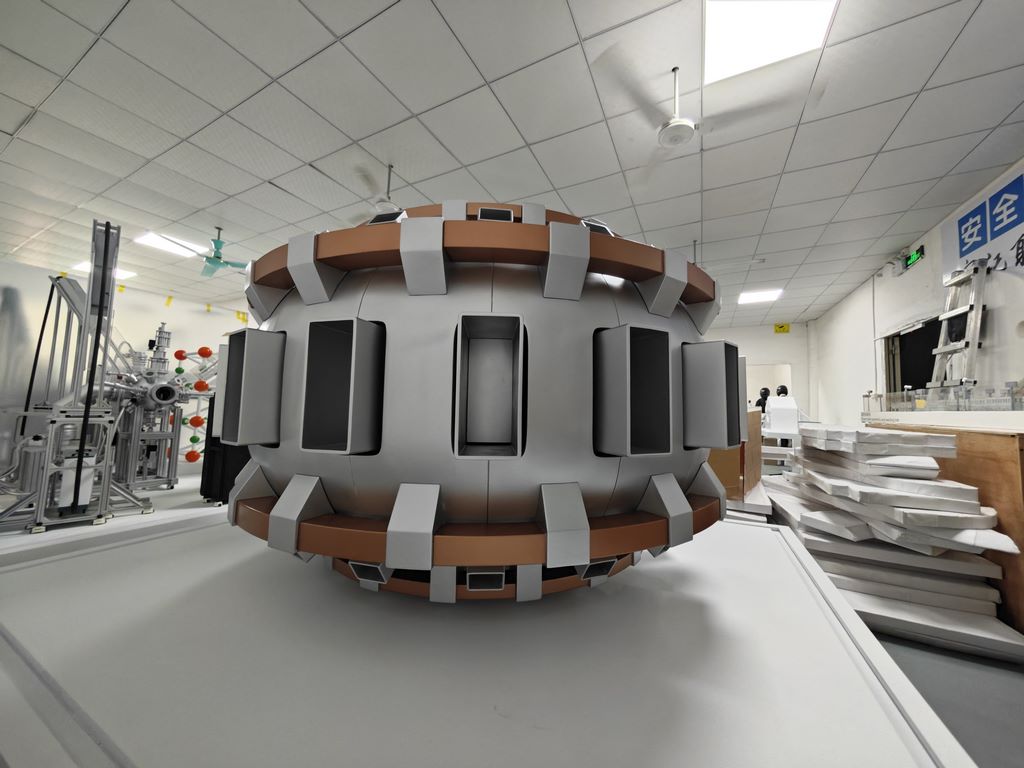
Top Ring Component: Precisely bond the completed brown ring component to the top of the sphere. The square protrusions on it can be made separately and then pasted onto the ring.
Overall integration and refinement
After all components are installed, conduct an overall inspection. Use atomic ash or model soil to fill the small gaps between the components and the sphere, as well as any remaining defects on the surface of the sphere. After it is completely dry, use sandpaper (which can be combined with water grinding) from coarse to fine for comprehensive and fine polishing, with the goal of achieving a smooth and coherent surface of the model similar to industrial products, with all seams disappearing, as if it is formed as a whole.
4、 Post processing and texture shaping
Primer treatment and defect inspection
The overall model is sprayed with gray water-based grid soil. This layer of primer can effectively unify the color of the base layer and expose any minor scratches or unevenness for final polishing and correction, laying a solid foundation for presenting a perfect paint surface.
Color separation spraying and texture expression
Main color spraying: The overall spraying is silver gray metallic paint. It is recommended to use a fountain pen for multi-layer thin coating, with each layer being thin and even until it completely covers the base color. This can achieve an extremely delicate and smooth silver gray surface, effectively simulating the metallic texture. Choosing matte or semi matte paint can avoid the reflection of cheap “toys”.
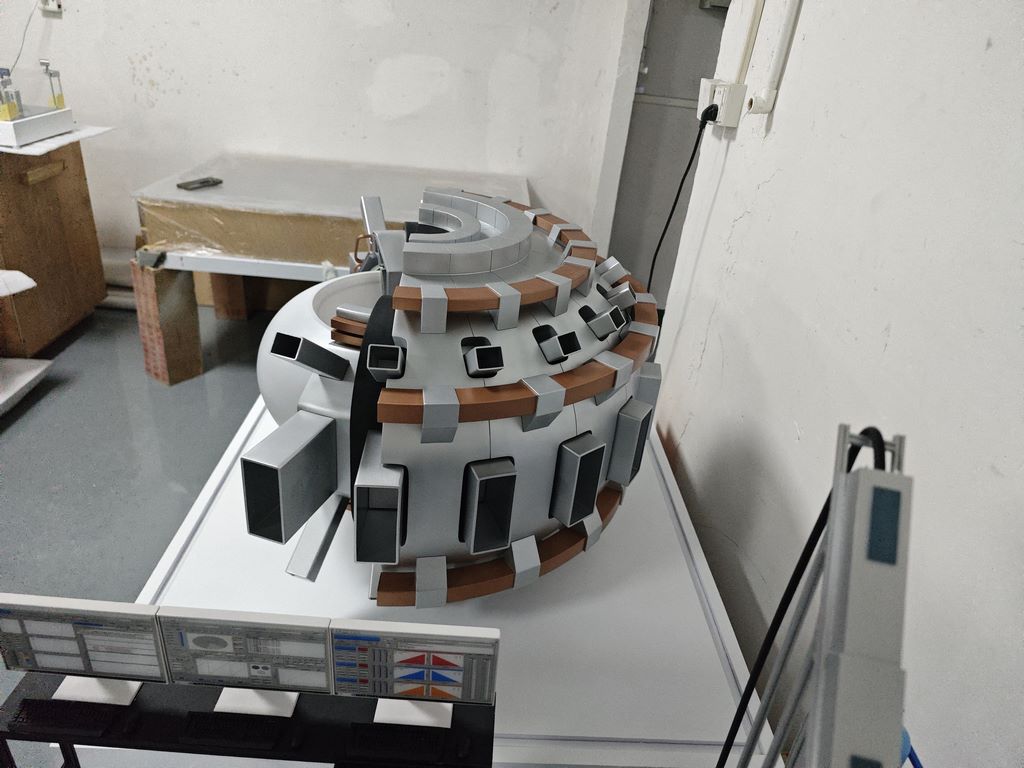
Detail coloring: Use masking tape to precisely protect the silver gray area, spray the top circular component and other small parts that may need to be colored in dark brown.
Staining and aging (optional): To enhance the realism and three-dimensional effect of industrial equipment, diluted dark gray or black stain solution can be applied to the entire model, allowing it to naturally flow into the opening interior, strengthen the frame edges, and other structural junctions. Subsequently, dip a soft cloth in a small amount of solvent and gently wipe the surface protrusions, leaving the shadows of the depressions. This can highlight details, add slight usage traces, and make the model more story telling.
The ultimate protection
After all paint surfaces are completely dry, spray 1-2 layers of matte protective paint evenly on the whole. This step is crucial as it can effectively protect the delicate paint surface from fingerprints and scratches, and unify the overall gloss, giving the silver gray a high-end and stable texture, completely eliminating the plastic feel, and ultimately achieving a highly realistic visual effect.