Cartoon sculpture model manufacturer
1、 Material selection and preliminary preparation
Main body shaping material
High density EPS foam board (main frame): lightweight and easy to carve, suitable for shaping the rounded outline of cartoon images;
Unsaturated polyester resin+glass fiber cloth (surface reinforcement): enhance the structural strength of the foam main body to prevent deformation;
Atomic gray (detail filling): used to repair minor flaws after carving and improve surface smoothness.
Details and Decorative Materials
Lightweight clay (eye sockets, claw pads, and other three-dimensional components): Strong plasticity, can be directly adhered to the surface of the main body;
Acrylic Hemisphere (Eye Substrate): Transparent material facilitates drawing of pupil details and simulates a moist luster;
Yellow matte car paint (main color tone), off white acrylic pigment (light colored area on the abdomen), dark green and black nitro paint (eyes): ensure bright and long-lasting colors.
2、 Main structure manufacturing process
1: 1 scale prototype carving
With the design drawing as a reference, cut the EPS foam board into head, torso, limbs and other modules, and splice them into a rough outline through hot-melt adhesive. Use an electric wire cutter to trim the rounded head curve, and use sandpaper to polish the abdominal curvature to ensure it conforms to the cartoon character “chubby”.
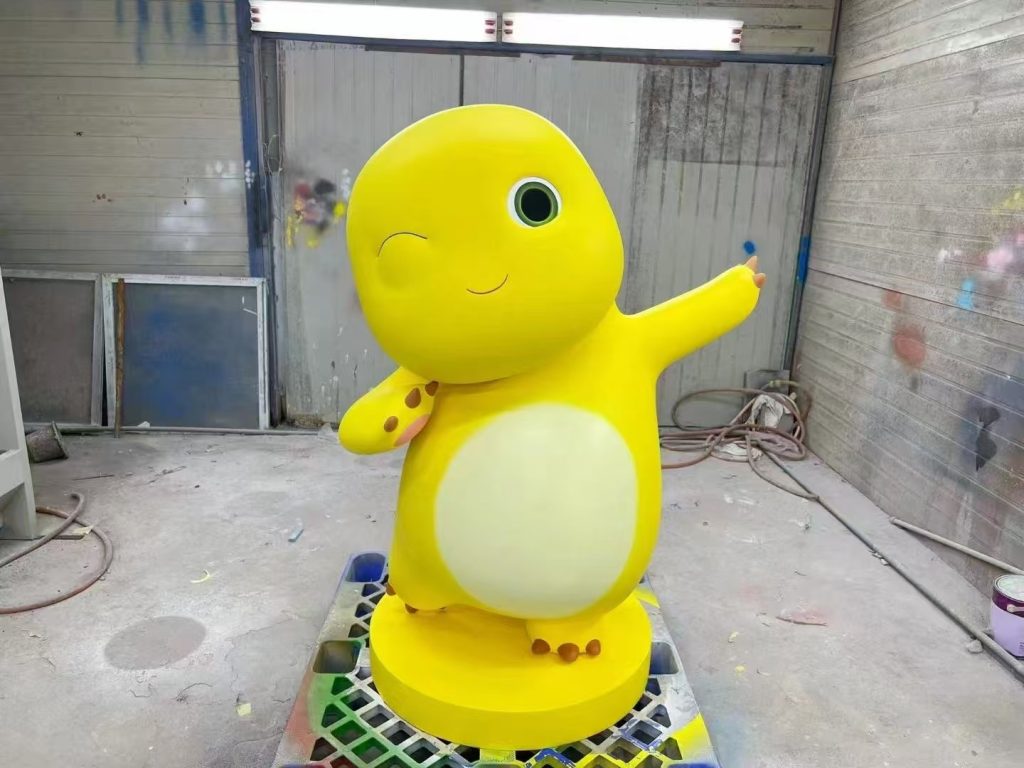
Key dynamic details: the left arm naturally bends and adheres to the side of the body, the right arm extends outward, and the palm slightly lifts up; Stand with legs apart, with feet at a 45 degree angle to the base, enhancing the balance and vividness of the sculpture.
Surface reinforcement treatment
Brush resin and glass fiber cloth in three layers: first evenly coat resin on the foam surface, cover a layer of fiber cloth and compact it, and then repeat the operation after curing to form a firm surface with a thickness of about 2mm. Polish the cured surface with sandpaper, remove the texture of the cloth, and make the overall touch smooth.
Fill the bubbles and gaps generated during carving with atomic ash, dry and roughly grind with 80 grit sandpaper, then finely grind with 240 grit sandpaper to ensure that the surface has no unevenness.
3、 Detail component production and installation
Stereoscopic Eye Styling
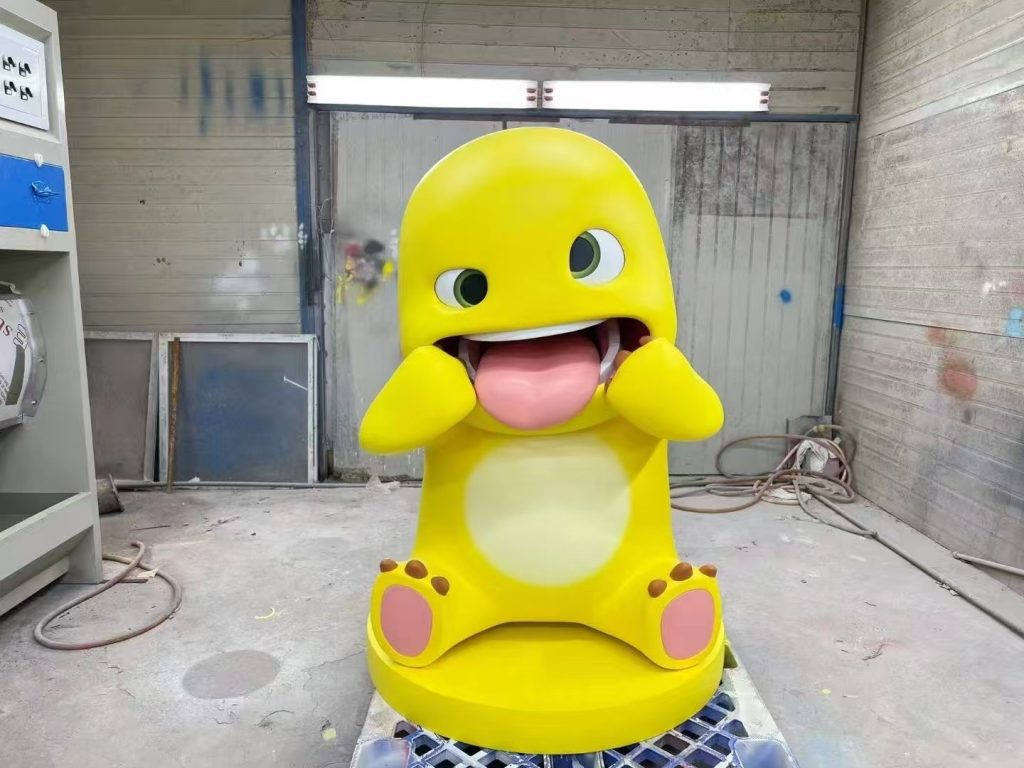
Eye socket treatment: Carving a circular depression with a diameter of about 10cm and a depth of 2cm at a preset position on the head, polishing the edges into a slope shape to enhance the embedding of the eyeball;
Eye production: Brush the inner side of the acrylic hemisphere with white primer and dark green nitrocellulose paint in sequence. After drying, use a black marker to hand draw a circular pupil, leaving a 0.5cm green transition zone at the edge of the pupil. Finally, draw a white highlight point (diameter 0.3cm) to simulate the effect of light reflection.
Wink eye shaping: Use lightweight clay to create a crescent shaped eyelid, stick it above the left eye socket, and use tools to press out natural folds on the edge of the eyelid, creating a contrast with the right open eye.
Claw pads and facial expression portrayal
Claw pad: Take brown lightweight clay and rub it into a hemisphere with a diameter of 1.5cm, press it into a circular piece with a thickness of 0.5cm, and paste 3 pieces (distributed in a triangular shape) on each foot. Use a toothpick to press out small textures on the surface;
Mouth expression: Use a carving knife to carve a smile curve in the center of the face, with the corners of the mouth raised 15 degrees and a depth of 0.3cm. The inner side is coated with white acrylic paint and then covered with pink paint to simulate the soft texture of the lips.
4、 Layered coloring and effect enhancement
Primer and main color spraying
Overall spraying of white epoxy primer: evenly cover the surface of the sculpture, and after drying, lightly polish with 400 grit sandpaper to enhance the adhesion of the topcoat;
Main yellow coating: High pressure airless spray gun is used to spray matte yellow car paint, which is carried out in two stages (first thin spray as a base layer, and second thick coating for color development) to ensure uniform color without sagging. When spraying, pay close attention to the connection between the head and torso to avoid color difference.
Regional color processing
Light colored area of abdomen: Cover the yellow area of the main body with masking tape to expose the elliptical area of the abdomen (20cm long and 15cm wide), spray off off with off white acrylic paint, and use the “dry spray” technique to blur the transition at the edges to avoid stiff lines;
Eye assembly: After the main body paint dries, embed the prefabricated acrylic eyeballs into the eye sockets, fill the gaps with white glass glue, and cover the glue traces with yellow pigment after drying.
Detail hand drawn and highlight embellishment
Claw pad coloring: Dip a fine bristled pen in brown acrylic paint, outline the contour along the edge of the claw pad, and then apply it flat on the inside to draw dark brown spots;
Facial Highlights: Use white acrylic paint to highlight 0.5cm diameter highlights on the forehead, nose tip, and chin to enhance the three-dimensional effect; The inner side of the smile curve is overlaid with bright pink, highlighting the affability of the expression.
5、 Base integration and final calibration
Base production
The same EPS foam round base (diameter: 30cm, height: 5cm) as the main body is used to carve a round base. After the surface is painted with yellow primer, it is spliced with the main body. The joints are filled with putty. After polishing, the overall yellow finish is sprayed to ensure uniform color with the main body.
Overall posture adjustment
Standing stability check: Gently push various parts of the sculpture to ensure no shaking; If the center of gravity is offset, correct it by thickening one side of the base or adjusting the leg angle;
Detail restoration verification: Compare the design drawings, fine tune the eyelid curvature, arm opening angle, and corner of the mouth to ensure a similarity of over 90% with the original image.
6、 Finished product protection treatment
Full surface spray transparent matte varnish: forms a protective film to prevent color oxidation and fading;
Key area reinforcement: Apply an additional layer of varnish on the surface of vulnerable parts such as claw pads and eyelids to enhance wear resistance.