Manufacturer of exhibition models for ancient buildings
Scheme for making miniature models of ancient buildings
1、 Design planning and material preparation
Before starting, it is necessary to conduct thorough research on the target building. Through consulting historical data, mapping drawings and multi angle photos, the roof shape, arch of wooden architecture type, bay proportion and other characteristics are analyzed. Draw detailed drawings of each elevation and section according to the selected scale (such as 1:50), and disassemble components such as roofs, beams, columns, foundations, and decorative elements. Material selection is crucial: the main structure should be made of delicate and easy to carve oak or light wood; Fine railings, window mullions and arch of wooden architecture shall preferably adopt tenon and mortise technology, and laser cut basswood laminates can also be used to ensure the accuracy; The tiles are made of clay tablets or finished plastic tiles; The roof curve is formed by hot bending plastic wood strips or ABS boards; The pigments are model specific water-based paints and natural mineral pigments; Finally, use matte protective paint to unify the texture.

2、 Core production process flow
Foundation and main framework construction
Firstly, create a solid foundation and determine the position of the column foundation. The columns must be absolutely vertical, and the crossbeam connections can be reinforced with micro mortise and tenon joints combined with a small amount of model glue to ensure the stability of the frame. This is the ‘skeleton’ of the entire model, and its accuracy directly determines the solemnity of the final form.
Roof making – the soul of models
The beautiful curves of ancient building roofs are a difficult point in production. First build the keel, then lay the roof panel. Tile making is particularly time-consuming: clay can be pressed into thin sheets, tile ridges can be drawn with a carving knife, or tile molds can be used for mass production. When laying, start from the eaves and stack layer by layer up to the ridge. Each piece needs to be carefully adjusted to reproduce the real stacking relationship and smooth curves. The eaves need to be reinforced separately to create a light and upward posture.
Carving and installation of detailed decorations
Doors and windows, railings, arch of wooden architecture, etc. are the essence of the model. Thin oak boards can be used to carve lattice patterns on doors and windows, pursuing transparency. The arch of wooden architecture layer can be combined after carving layer by layer. Although it is small, the layers need to be clear. All detailed components should be individually polished smooth before installation, and then precisely bonded with tweezers.
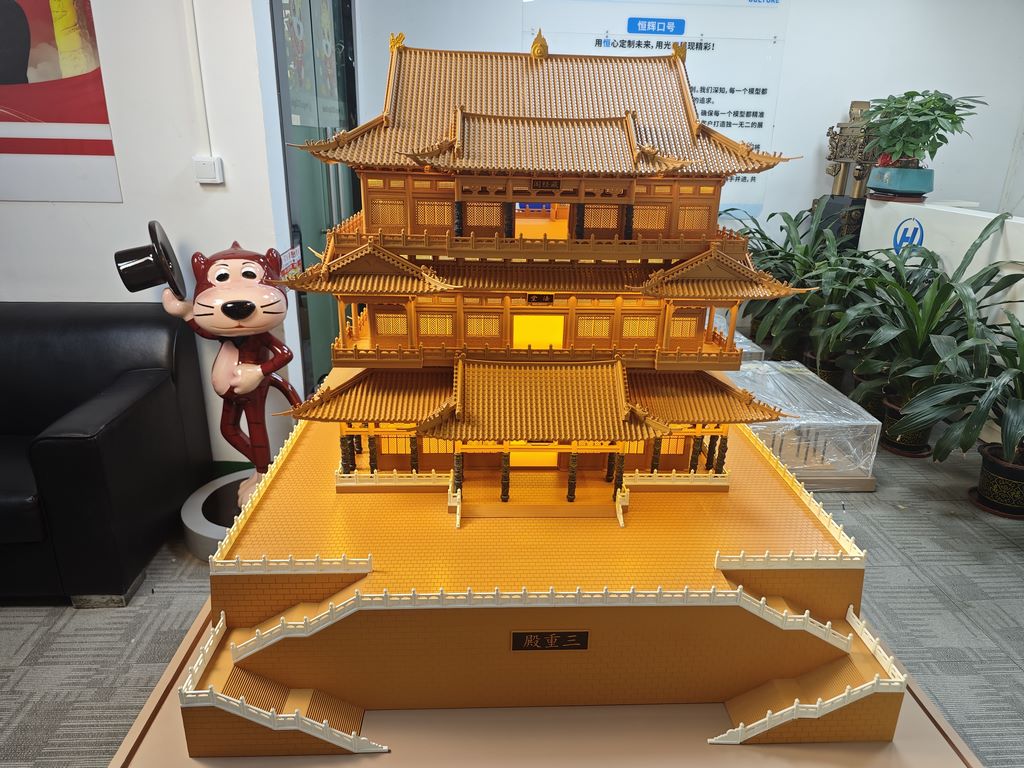
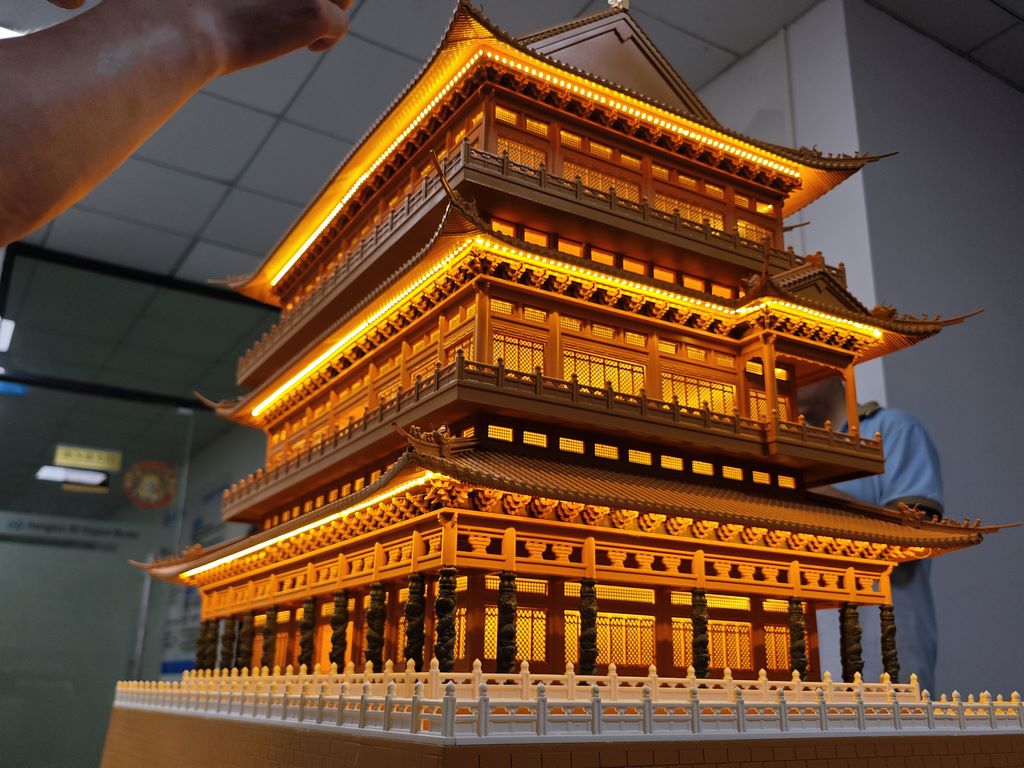
Lighting system implantation
To reproduce the warm indoor lighting effect in the picture, wiring needs to be done before the main structure is closed. Using warm yellow miniature LED beads, the circuit is cleverly hidden within the beams and columns, allowing light to penetrate through hollow doors and windows, creating a serene and profound atmosphere.
3、 Post processing and coloring for aging
Grassroots treatment and base color spraying
Fill the joint with gypsum putty, dry it thoroughly, and then polish it thoroughly to make the surface smooth. Subsequently, spray a light gray primer, unify the base color, and inspect for defects.
Layered coloring and texture shaping
Wooden parts: Columns, beams, doors and windows are sprayed with a gradient of ochre and dark brown to simulate the texture of wood. Key areas can be “decorated” with a fine pen dipped in dark paint to enhance the wood grain effect.
Wall section: Spray painted in beige or light gray, lightly wash the concave and convex areas, and highlight the texture of the bricks and stones.
Roof section: According to the building grade, the roof can be covered with glass green glaze or ceramic tiles gray black. After coloring, you can use the dry sweep method to lightly sweep the gray white color on the edge of the tile ridge, simulating the erosion marks of wind, frost, rain, and dew, instantly enhancing the realism.
Overall aging and protection
Use a very thin brown stain solution to moisten the entire body, making the color calm down. The pigment that seeps into the corners can form natural shadows. After it is completely dry, spray a matte protective paint as a whole, which can protect the paint layer and eliminate plastic reflection, achieving a quaint and elegant final effect.